Wednesday, March 30, 2011

Happy Spring!

Hi all!  Well, the rain here seems to finally have subsided and today it's a gorgeous sunny day in the 80's.. Yay! Crazy weather, we've been having, I tell ya!  Just a day or so ago it was in the mid 50's, gloomy and raining. Anyway, I thought I would share some sunny springtime cheer, and get in two challenges to boot! 8-)


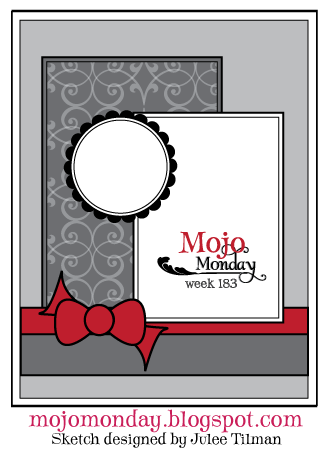
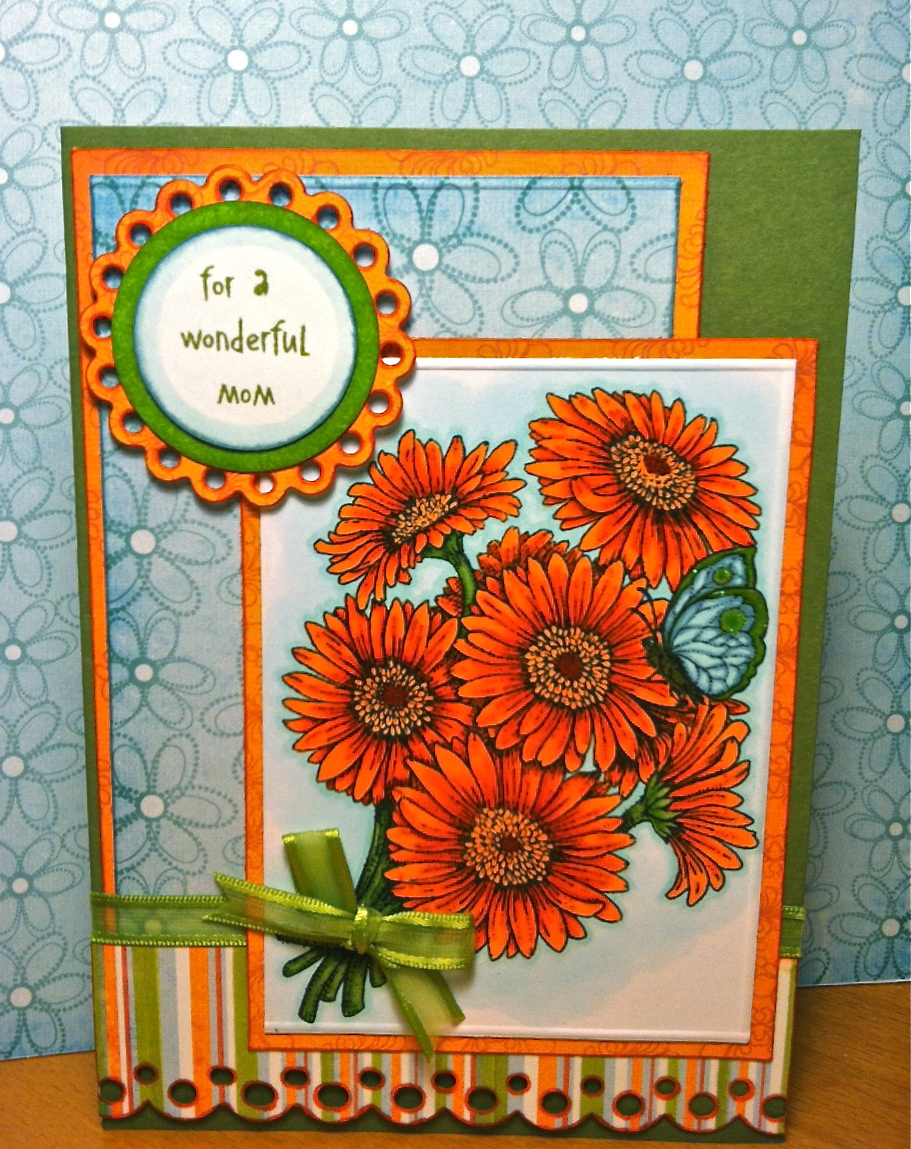
For today, I chose CR84FN Color Challenge #21 to use the colors Garnet, Chartreuse and Cream, which are colors I never would have thought to put together on my own, so it was a fun challenge for sure, to stretch my imagination a bit, color wise.  I also chose The Mojo Monday Sketch Challenge #184,  Round or Square.... Hmmm, well, it ended up being more of a  rectangle for me LOL, but all the elements are there.. 8-)


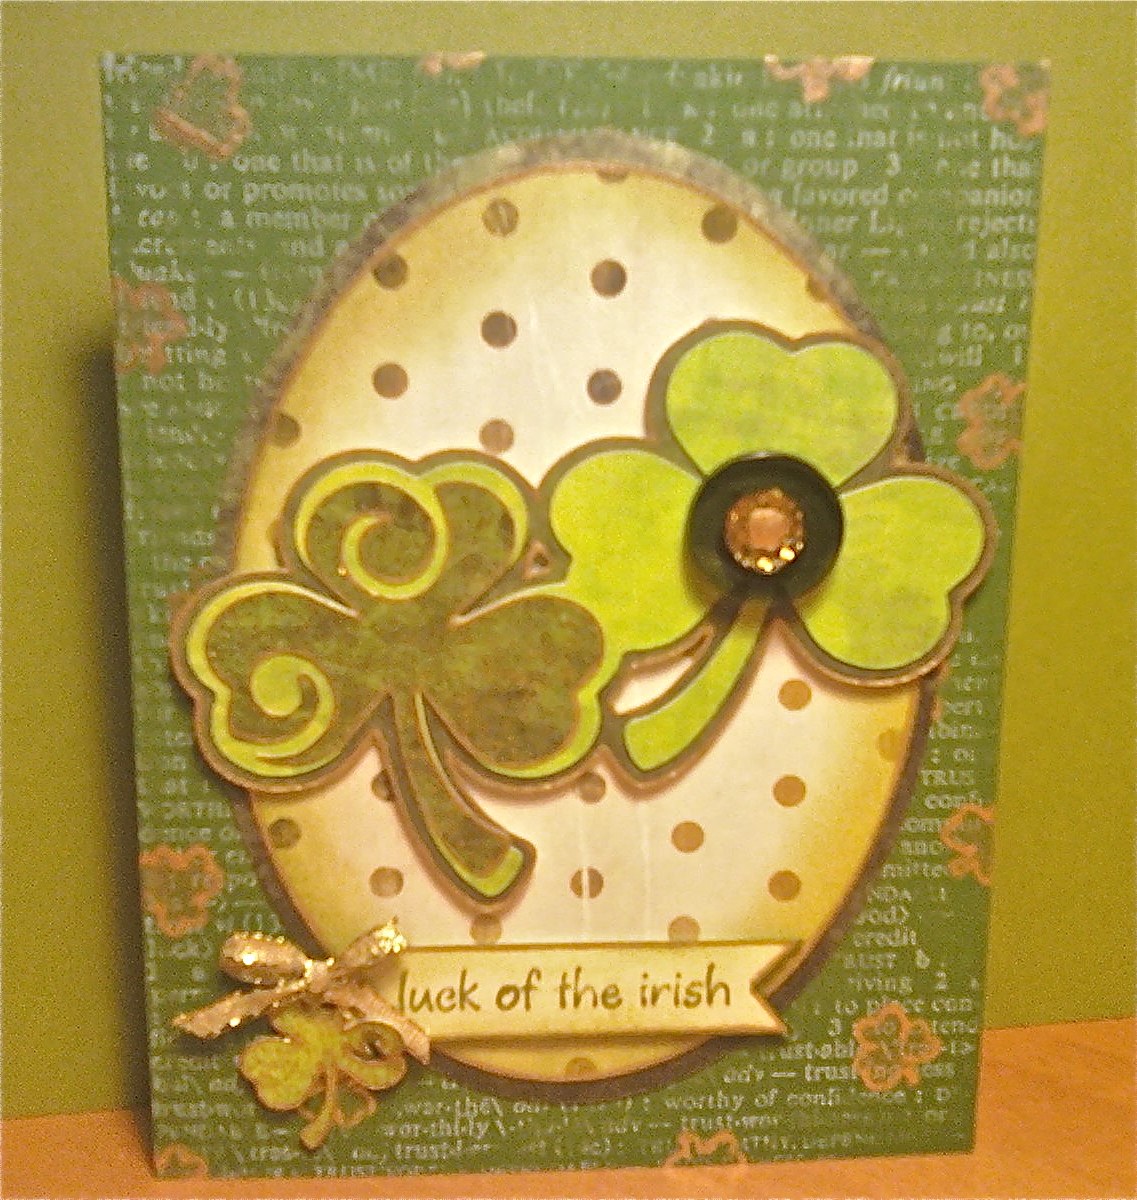
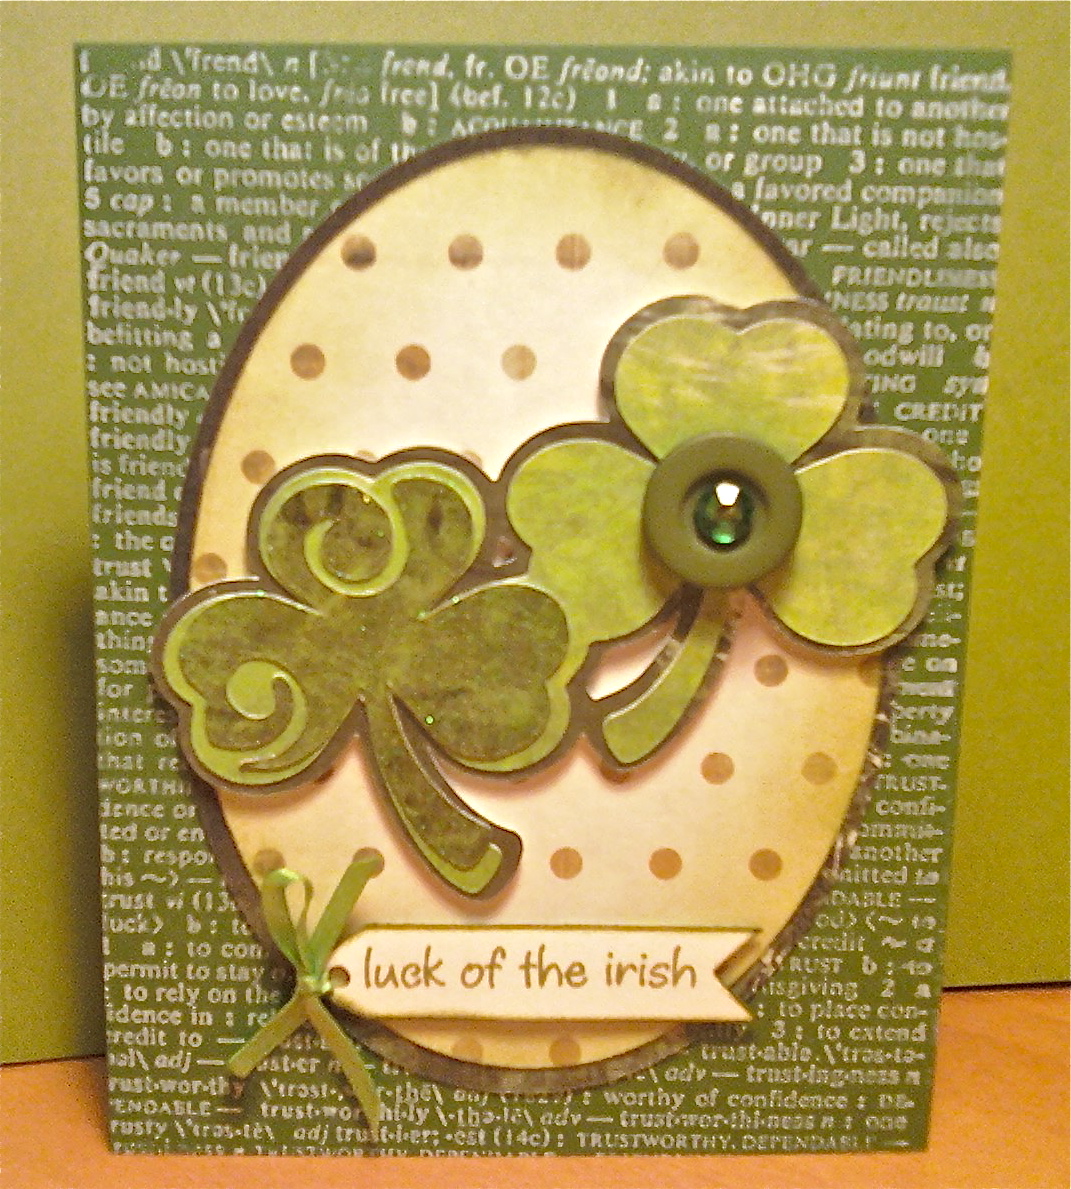
I stamped my Impression Obsession Image onto Flourishes Classic Ivory with Memento Tuxedo black and colored it up with my Copics.  I got to used some of my newly acquired Nesties, Classic Squares and Classic Scalloped Squares to cut out my image and give it a fun little decorative mat.  I used a combination of solid colored cardstock from my stash, ( I always love when I can use up some of my left over pieces from previous projects, makes me happy! 8-)...) and some gorgeous Digi DP from Jo Hanna featured at Two Peas in a Bucket.  My Stampendous sentiment was stamped with Memento Tuxedo black onto an adorable little pennant created with another of my new Nesties sets, Lacy Pennants.  And that's pretty much it, I added a a couple of pretty punched borders with the help of a MS border punch, popped up my image and sentiment pennant with some dimensionals, added a bit of ribbon from Michaels and a cute little button to finish it all up. 

Thanks so much for visiting today! 8-)

Saturday, March 26, 2011

Challenge Saturday....?

Hi all!  Well I thought I would try to squeeze in one more creation for the week, it's been pretty hectic.. I think it must have been due to the after affects of the Super Moon last Saturday night, it was a wacko week here for sure, LOL.  Anyway, I thought I would try something  a bit different this time, for me anyways, and try to combine at least 3 Challenges and get them posted before time runs out for each of the them.. I am just making it under the wire for two of the three...Whew! 8-)


I Chose Flourishes Timeless Tuesday Challenge #110,  to use a  Masking technique, The Mojo Monday Sketch Challenge #183 and last but certainly not least, The Color Throwdown's Challenge #134.  Whew!  Believe it or not, that was quite an accomplishment for me, first time combining challenges, took me a couple of days to sort it all out..LOL  But it was a lot of fun and the outcome was definitely worth it, to say the least. 8-)


I stamped my image using Flourishes Gerber Daisy's stamp set with Memento Tuxedo Black onto some Flourishes Classic White cardstock.  See the cute little Butterfly?  Well I stamped him first and created a mask for him, and then stamped my Gerber daisy Bouquet over him, removed the mask and Voila, there is my cute little butterfly taking time to smell the flowers LOL...  I colored up my fun little bouquet with my trusty Copics using a couple of the Collections grouped by Flourishes and added a touch of glitter glue to my butterfly's wings.  I put a nice little embossed edge on my Image panel and BG panel with my Score Pal and matted them up with some adorable digi DP from Kate Teague featured at Two Peas in a Bucket.  My Impression Obsession sentiment was stamped with Pealed Paint Distress ink onto my layered eyelet circle that I created with my Eyelet Circles Nesties set and then popped it up with some dimensionals.  And that's pretty much it, I used my MS Traditional Scallops border punch for the bottom panel and added some ribbon form Michaels and put it all together, and there you have it, my very first combined challenge card! 8-)

Hope you all are enjoying your weekend & Thanks so much for stopping by!

Wednesday, March 23, 2011

From the Garden...

Hi all!  Well, it's still raining and gloomy here so I thought I would do some positive thinking and focus on what I would normally be doing this time of year, playing in the garden, weather permitting of course LOL...  So since I can't be out playing in my garden right now, I thought I would color up this adorable garden scene from Flourishes' From the Garden clear set instead and play along with this weeks CR84FN20 color challenge. 8-)


The colors this week are Plum, Lavender and Green... I think my creation should work pretty well for the challenge.  I decided to do another fun little Post it Note Holder similar to the one I made last week, but I taylored  it to the challenge colors.  If you missed last weeks post with the link to the  super easy tutorial by the talented Carolyn Draper of the UK with Stampin' Up, HERE it is again.  Hope you get a chance to try it out, they make great little gifts.

I stamped my Image with Memento Tuxedo Black onto Flourishes Classic White and colored it up with my trusty Copics.  I embossed the edges of my sweet little garden scene with  my Score Pal and matted it up with a bit of Hero Arts Foliage Layering Paper.  I cut a small scallop square for my second mat with my Cricut using the Lacy Labels cartridge and then  stamped it using Impression Obsession's Dots Cover a Card stamp with Distress Ink in dusty concord.  I attached all  my layers to my post it note holder, added a green mini pen, ( you can find them @ Staples) and Voila!  Another great little  post it note holder, but this one's From the Garden.  8-)

Hope you all had a great day and hopefully you had some sunshine were you are and got to go out and enjoy it. Thanks so much for visiting!

Monday, March 21, 2011

Springtime Bouquet!

Hi all!... Well, it's been raining hear for the past two days and the sun finally decided to come out and say hello. Hopefully, it will hang out for a while, but the Weatherman says there's more rain on the way.  So I am posting this cheerful little card I made a while back for a dear friend and for an older Impression Obsession challenge to tie us over till all this rain stops. LOL


My image for this happy little card is also from Alesa Baker's Daisy Love clear set that I picked up at Impression Obsession.  I stamped it with Memento Tuxedo Black onto Flourishes Classic White and embossed it with Stampendous Midnight Black embossing powder.  I colored up my pretty little bouquet with Copics and used a bit of Antique Linen Distress ink to shade the edges.  I put a nice little embossed edge around my image and coordinating DP from Graphic 45.  And that's pretty much it, I matted it all up with some olive green cardstock from my stash, and Voila! There you have it, my pretty little Springtime Bouquet card. 8-)

Hope you all stay warm and dry & Thanks so much for dropping by today! 8-)

Thursday, March 17, 2011

Spring Daisy Note Holder...

Hi All!  One of my favorite Stamp Company's, Impression Obsession, is having a super fun Challenge today to create "Anything But a Card" and I just had to play along.  I saw this great tutorial for a cute little post it note & pen holder by the very talented Carolyn Draper of the UK with Stampin' Up.  There are really a lot of wonderful tutorial videos on Youtube for all types of these post it note holders, but this was actually the one I liked the best.


It was super easy and a lot of fun to make, so I ended up making a bunch of them. LOL  I figured what great little gifts these would make and it would be good to have some all made up and ready to go just in case a last minute "Little Something" was needed. 8-) 


For my main image and sentiment, I chose Impression Obsession's Daisy Love  clear stamps set #CL251 by Alesa Baker.  I can tell that this is going to be one of my "go to sets" this Spring, I just love it, so versatile and cheerful. 
I stamped my Daisy with Memento Tuxedo Black onto Flourishes Classic white and colored it up with my trusty Copics.  I embossed the edges of my image with my Score Pal and matted it up with some coordinating cardstock from my stash.   I cut a small scallop square for my second mat with my Cricut using the Lacy Labels cartridge and then stamped it using Impression Obsession's Dots Cover a Card stamp with Distress Ink in dusty concord.  I attached all my layers to the post it note holder, added the mini pen, ( you can find them @ Staples ) and there you have it, an adorable Spring Daisy Note Holder.  Enjoy!   

Hope you all have a wonderful St. Patty's Day & Thanks so much for visiting! 8-)


Wednesday, March 16, 2011

A Touch of Gold...

Hi All!  Well you know that I already made my St. Patty's Day cards, but I just saw the current Cricut Circle Challenge #124  and decided to whip up just one more specifically for this challenge.
The challenge specifications were to use rainbow OR a monochromatic green color scheme and they wanted to see us add a touch of gold to our project.


I created this Luck of the Irish ensemble pretty much the same way as I created my previous ones, accept  that I added several little touches of gold. I did my BG as I did previously, this one I chose to use the Hero Arts Friends Definition stamp and then I stamped over it with little shamrocks from the Flourishes' Irish Blessings stamp set with gold pigment ink.  I used my Cricut to cut my Shamrocks using the Celebrate with Flourish cartridge and my Ovals with the Plantin Schoolbook cartridge as I did before, but this time I edged most of my pieces with my Sakura Gold Metallic jellyroll pen before layering them together.  I also created an extra cute little shamrock charm edged with gold and covered with gold glitter glue to tie together with a fun little gold bow to my Impression Obsession sentiment. 


Here's a another little shot of my card that shows off a bit more of the gold touches and gold glitter.  I know it's still hard to see but it looks really great in person.  One of the things on my to do list is to invest in a good digital camera. Believe it or not,  I am kind of embarrassed to say so, but all of my blog pictures are taken with my cell phone.  I know, crazy huh?.. 8-)

For more details on my Luck of the Irish cards, you can click on my Blog Archive link titled  Luck of the Irish, or just scroll down, it was only a few posts ago. LOL


In the meantime, I hope you all are ready for St. Patty's day and are armed and ready with your favorite green attire.  Have a great day & Thanks so much for dropping by. 8-)

Monday, March 14, 2011

Springtime Birthday!

Hi All!  Happy Monday to you.  It's such a pretty day out here today, that I thought I'd share some Spring time cheer.  8-)  Here is a cute little Birthday Card that I made for a dear friend of mine to brighten up her special day!


This card was super easy to create, very clean and simple.  I stamped my Impression Obsession Image onto Flourishes Classic Ivory with Memento Tuxedo Black and then embossed it with Stampendous Midnight Black embossing powder.  I colored up my image with my trusty Copics and chose some fun springy DP from K&Company and a bit of pink cardstock from my stash to compliment it.  I used my Score Pal to put a nice little embossed edge on my image and DP, matted it all up and voila!  Instant Springtime Birthday Card.  

Hope you all get a chance to enjoy some sunshine where you are, thanks for stopping by! 8-)

Wednesday, March 9, 2011

Cheers to Green Beer!

Hi All!  Well, my new St. Patty's Day stamps did finally arrive, hurray!  But again, while I was still waiting for them to be delivered, I came up with another St. Patty's Day card idea.  I mixed a few stamps together that were already in my collection using a masking technique that I learned from a great tutorial by a fabulously talented designer, Ms. Julie Koerber.  If you get a chance you must go and check out her blog and her gorgeous cards!  As for my new St. Patty's Day stamps, they will just have to wait till next year.. 8-)


Believe it or not,  I used two different stamps for the main image of my card.  I think they blend together pretty well, considering they are from two different companies.  First I stamped the small beer mug from DRS, I purchased from Addicted to Rubber Stamps, onto Flourishes' Classic White using Memento Tuxedo Black.  Next I stamped it again onto a sticky note and cut out my image to create a mask.  I placed the mask over the first small beer mug I had stamped and then chose a clover stamp from Flourishes' Irish Blessings clear stamp set to stamp overlapping the small beer mug image.  I then removed the mask and voila!  It looks like the small beer mug is sitting in front of a lovely flourish of clovers.  Pretty cool huh? 8-)
I then added my sentiment, also from Flourishes' Irish Blessings clear stamp set.  I colored up my main image with Copics and used some white liquid applique to make the beer foam extra foamy.  I matted up my main image using some of Hero Arts Foliage cardstock  as well as some gorgeous floral Digi DP from Anita Richards Designs featured at Two Peas in a Bucket. I embossed one of my Foliage panels with my Cuttlebug using the CB Swiss Dots embossing folder and I embossed the edges of my main image and floral Digi DP using my score pal, to create a nice finished look.  Then I just popped my main image up with some dimensionals and added a cute little bow to finish it up.

May the luck of the Irish be yours & Thanks so much for dropping by! 8-)

Friday, March 4, 2011

Luck of the Irish!

Hi All! Well, St. Patrick's Day is fast approaching, and being the good Irish Lass that I am, I just had to create some cute little cards to mark the occasion. 8-)
One thing I have a real challenge with each year, is finding cute St. Patrick's Day Stamps that I like, to work with.  This year I found a few that I really liked, but they have yet to arrive.  I am keeping my fingers and toes crossed that they will be delivered in time for me to get crafty with them for this years festivities.  And of course, if worse comes to worst, I can always use them for next year, so they definitely won't go to waste. LOL

In the meantime, I went through all my design papers and hunted through my Cricut cartridges and ended up creating this cute little number while awaiting the arrival of my new stamps...
 

I had a tough time deciding on my main image sizing and my background designs, so many choices LOL.  I decided to just have fun & go with it, so  here are a few of my variations...

After I figured out my basic layout, it was pretty easy to put these together.  
First, I chose my design paper and decided to go with Some really great digi-papers from two different designers featured at Two Peas in a Bucket,  MaryAnn Wise and Anita Richards.  I cut out all my main image pieces with my Cricut using the Celebrate with Flourishes cartridge and the Plantin Schoolbook cartridge.  I stamped my backgrounds using various Impression Obsession cover-a-card background stamps and embellished my cut pieces with a little distress ink and glitter glue. 
I layered all my pieces together and attached them to my card.  I added a cute little button/gem combo to the un-glittered Shamrock and then popped them up using dimensionals. And to finish it all up, I added a fun little bow and tag with my sentiment. 

Hope you all have a great weekend & thanks for stopping by! 8-)

Thursday, March 3, 2011

Oh Baby!...

Hi All!  It's a rainy night here in Altadena, so it's the prefect time to get to work at my crafts table and craft up some new cards.  I created this card for Impression Obsession's Blue Challenge, but I think it might also work real well for a Flourishes Challenge as well.  I just fell in love with the adorable little moon in Montagerie's Baby clear stamp set.  I have been so anxious to ink it up and create some adorable baby cards and these challenges gave me the perfect excuse to begin, so here's my first...
I stamped my little moon onto Flourishes Classic Ivory cardstock with Memento Tuxedo Black and then embossed it with Stampendous Midnight Black embossing powder.  I pulled out my Copics to color him up and used my Cricut die cutting machine and the Plantin Schoolbook cartridge to cut out the ovals for my main image, mats and sentiment tag.  I stamped my background with Impression Obsession's Dots Cover-a-Card stamp and used a bit of Basic Grey's Kioshi DP for the bottom panel.  I used my Martha Stewart Traditional Scallops Border punch, some ribbon from Michaels, a cute little button from Basic Grey and bit of hemp cord to tie up a fun little bow.  And lastly, I popped my matted main image on to my card using dimensionals to finish it all up! 8-)

Have a great night, hope you all stay warm and dry & thanks for dropping by!